Learning How to Tattoo Cattle
Explained in detail with pictures of each step.
On a registered beef cattle farm it is usually required or at least recommended to tattoo cattle. Tattooing is a means of unique identification if the breeder wishes to register purebred animals with breed registries or exhibit them at livestock shows. Tattooing cattle when done right is a permanent identification mark that will stay with the animal all through life. Permanent identification methods of cattle on a beef farm indicate good management practices and will add to the credibility of the operator.
It is easy to tattoo cattle, however that is not the only system of identification but there is none more permanent and it sure comes in handy when cattle lose the temporary ear tags. Breed associations and most shows require permanent identification and the cattle tattoo will satisfy both of these. Most breed associations will have their own recommendations to tattoo cattle so you will need to check to be sure you tattoo your cattle in the correct manner and with the correct information.
Even though the cattle tattoo is a method of identification that is permanent if properly done it is not easily viewed unless the animal is restrained. For this reason it is advisable to add another complementary type of identification such as an ear tag or brand that is visible from short distances.
Instructions to Tattoo Cattle
To tattoo cattle will require tattoo pliers, numbers or letters made of sharp, needlelike projections which pierce the skin and tattoo ink or paste.
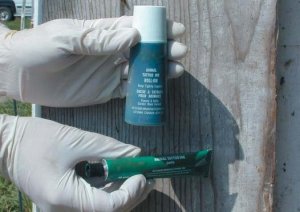 For inking green paste is my favorite and I find it shows up better in dark eared cattle. Roll on applicators are less messy and easier to use but on average the tattoos are not as legible. I believe the reason for a less legible tattoo with a roll on applicator is because it is too easy to substitute speed for quality. You will also need a way to restrain the cattle while the tattoo is applied, a cattle chute and cattle head gate works well for this. For inking green paste is my favorite and I find it shows up better in dark eared cattle. Roll on applicators are less messy and easier to use but on average the tattoos are not as legible. I believe the reason for a less legible tattoo with a roll on applicator is because it is too easy to substitute speed for quality. You will also need a way to restrain the cattle while the tattoo is applied, a cattle chute and cattle head gate works well for this.
First step to tattoo cattle is gather tools.
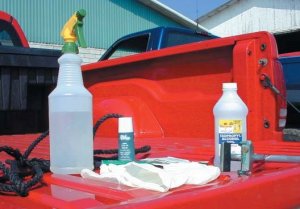 Biosecurity protocol should be followed by working in an environment that is as clean as possible. Other measures to decrease spread of disease include wearing gloves, using separate cloths or pads to clean cattle ears and disinfecting equipment between animals. Biosecurity protocol should be followed by working in an environment that is as clean as possible. Other measures to decrease spread of disease include wearing gloves, using separate cloths or pads to clean cattle ears and disinfecting equipment between animals.
Below is a list of recommended materials used to tattoo cattle.
A good Cattle Tattoo Kit will include the Pro Series Tattoo Pliers and 3/8″ needle digits in both numbers and letters of the alphabet. Be sure your cattle tattoo equipment is properly maintained at all times. Always be ready by keeping it clean and replacing broken or dull characters in both letters and numbers. Keep a close eye out for a buildup of dirt or broken or dull equipment to avoid improper or illegible tattoos.
Tattoo Cattle, the Procedures with Pictures
Step 1. Clean Ear with Alcohol
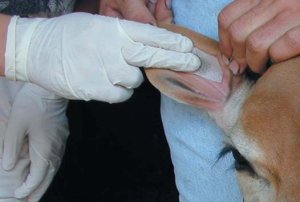 Using an alcohol pad, clean out the ear completely. Wax mixing with the ink can cause the tattoo to fade and become hard to read later on. Hair can also interfere with a proper tattoo, so the ears may need to be clipped. If no alcohol pads are available, rubbing alcohol and a soft clean cloth or cotton swab will work for removing the wax. Even a dry cloth to remove the wax is better than nothing. Cleaning is a good time to check and be sure the placement of a new tattoo does not interfere with a present or future tattoo. Also remember that the Brucellosis tattoo is placed in the right ear of female cattle. Using an alcohol pad, clean out the ear completely. Wax mixing with the ink can cause the tattoo to fade and become hard to read later on. Hair can also interfere with a proper tattoo, so the ears may need to be clipped. If no alcohol pads are available, rubbing alcohol and a soft clean cloth or cotton swab will work for removing the wax. Even a dry cloth to remove the wax is better than nothing. Cleaning is a good time to check and be sure the placement of a new tattoo does not interfere with a present or future tattoo. Also remember that the Brucellosis tattoo is placed in the right ear of female cattle.
Step 2. Applying Ink
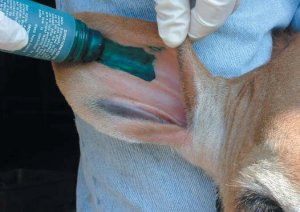 Apply a generous amount of ink over the area to be tattooed, usually between the middle ribs of the ear. Keep away from the hair around the edge of the ear. An area slightly larger than the tattoo equipment should be covered. You may find it a little messy but it is convenient to apply green paste ink with your finger. Apply a generous amount of ink over the area to be tattooed, usually between the middle ribs of the ear. Keep away from the hair around the edge of the ear. An area slightly larger than the tattoo equipment should be covered. You may find it a little messy but it is convenient to apply green paste ink with your finger.
Step 3. Tattooing
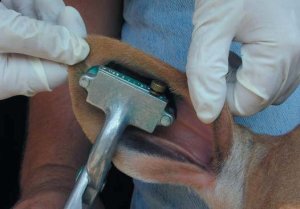 Hold the animal securely. After verifying the correct tattoo by punching it into a piece of paper, position the tattoo pliers in the center of the ear between the ribs of cartilage and squeeze firmly. Avoiding the ribs will prevent bleeding. Be sure to lift the tongs out straight to avoid ruining the tattoos with scratches. Hold the animal securely. After verifying the correct tattoo by punching it into a piece of paper, position the tattoo pliers in the center of the ear between the ribs of cartilage and squeeze firmly. Avoiding the ribs will prevent bleeding. Be sure to lift the tongs out straight to avoid ruining the tattoos with scratches.
Step 4. Reapplying Ink
Again, apply ink and rub in firmly. This single step will assure a lasting tattoo, if you have followed the above procedure. Your finger or an old toothbrush may be used to help push the ink into the punctures. In case of slight bleeding it is good to rub the ink in until bleeding stops so it does not wash out of the needle hole.
Step 5. Sanitizing Equipment
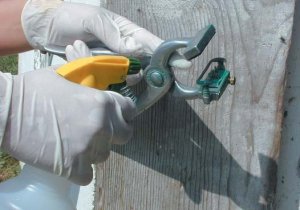 Sanitize the tattoo kit between animals by spraying rubbing alcohol on the pliers and the individual tattoo pieces that have been used. This cleaning will minimize infection in the tattoo and should be done before and after each procedure. Sanitize the tattoo kit between animals by spraying rubbing alcohol on the pliers and the individual tattoo pieces that have been used. This cleaning will minimize infection in the tattoo and should be done before and after each procedure.
Step 6. The Finished Product
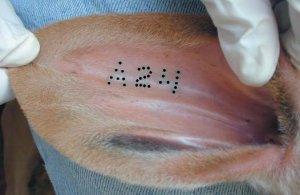 After several weeks, the ink will dry and flake out of the ear, leaving a legible tattoo and a permanent means of identification. After several weeks, the ink will dry and flake out of the ear, leaving a legible tattoo and a permanent means of identification.
This whole procedure is very easy to learn and with just a little practice you will become a seasoned cowboy and wonder why you ever dreaded the job to tattoo cattle.
|

 For inking
  Biosecurity protocol should be followed by working in an environment that is as clean as possible. Other measures to decrease spread of disease include wearing gloves, using separate cloths or pads to clean cattle ears and disinfecting equipment between animals.
 Using an alcohol pad, clean out the ear completely. Wax mixing with the ink can cause the tattoo to fade and become hard to read later on. Hair can also interfere with a proper tattoo, so the ears may need to be clipped. If no alcohol pads are available, rubbing alcohol and a soft clean cloth or cotton swab will work for removing the wax. Even a dry cloth to remove the wax is better than nothing. Cleaning is a good time to check and be sure the placement of a new tattoo does not interfere with a present or future tattoo. Also remember that the Brucellosis tattoo is placed in the right ear of female cattle.
 Apply a generous amount of ink over the area to be tattooed, usually between the middle ribs of the ear. Keep away from the hair around the edge of the ear. An area slightly larger than the tattoo equipment should be covered. You may find it a little messy but it is convenient to apply green paste ink with your finger.
 Hold the animal securely. After verifying the correct tattoo by punching it into a piece of paper, position the
  Sanitize the tattoo kit between animals by spraying rubbing alcohol on the pliers and the individual tattoo pieces that have been used. This cleaning will minimize infection in the tattoo and should be done before and after each procedure.
 After several weeks, the ink will dry and flake out of the ear, leaving a legible tattoo and a permanent means of identification.